.
Choosing Climbing Equipment + Building a Climbing Rack - Part 1
Learning to climb outside means gaining many new skills; one of these is building an understanding of the extra climbing equipment that is needed when climbing outdoors. We are often asked what equipment is required in different situations, how climbing equipment should be chosen and how to build a climbing rack.
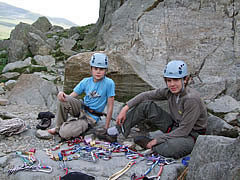
A climbing rack is the collection of hardware, slings and rope control devices that a climber carries to protect a route, set up belays and control the rope.
Inevitably when you start out climbing then your rack will have gaps in it and this will limit some of the routes that you can attempt, but building a rack around the kit that your climbing partners have and then sharing racks is good way around this problem.
 In general the rack you will need will depend on the length of the route you are attempting, its difficulty, the rock that the route is made from and the specific features in the rock formation.
The longer the route then the bigger rack of equipment that you will need to protect it; harder climbs often involve less featured, blanker sections that need more small, specialist gear to protect them and different rock types favour differing types of protection.
The first trick is to build up a rack that consists of the right amount of the right equipment so that you can protect a wide spectrum of climbs and the second is knowing what to carry in different situations – carrying enough kit to safely protect the climb and yet not carrying superfluous gear that will just weigh you down. Common sense, checking out the route from the ground and versatile gear together with a big dollop of experience all play their part here.
A summer rock climbing rack comprises the following items:
- Carabiners and Quickdraws
- Passive Protection
- Active Protection – Camming devices
- Slings
- Rope Controllers
- Emergency Equipment
These are our suggestions for different situations:
Carabiners and Quickdraws
Carabiners and their associated quickdraws will make up a significant proportion of the weight of your rack so try to go as light as possible, but never compromise on safety or function. On long trad routes you will be carrying 40 to 50 carabiners and choosing lightweight carabiners can save you over a kilo.
Wiregate quickdraws with the carabiners slung on skinny (8-12mm) dyneema are pretty much mandatory for traditional climbing and winter climbing, but for sports routes burly keylock solid gate quickdraws on wide (16-20mm) nylon tape are still best.
The reasons for this are exemplified by a couple of the best carabiners on the market at the moment the DMM Phantom and the DMM Shadow. The Phantom is a superlight wiregate and the Shadow is a tough, solid gate:
- Wiregates can be built to be lighter than solid gates. Thus the Phantom comes in at 26g and the Shadow 42g….and the Shadow is really light for its class.
- Resistance to upward progress comes from both the weight of your rack and the drag of your rope(s). Lightweight wiregates slung on long skinny dyneema draws both weigh less and create less drag.
- Wiregates also tend to have less gate flutter and freeze shut less easily than solid gates. Bear in mind that superlight biners such as the Phantom may not be ideal for winter climbing because with their light weigh comes a smaller size and in winter handling small biners with gloves can be a pain.
- Lightweight wiregate carabiners can be used for sport climbing, but the protection bolts on sports routes are made from steel and chew up aluminium carabiners too easily – badly made, badly positioned and badly placed bolts can cause biners to become scored, levered and generally abused. Durability, good handling and keylock noses are the prime characteristics to look for here – weight is still important i.e., the Shadow weighs 42g compared to the previous class leader the Petzl Spirit (49g) especially on on-sight attempts. The quickdraws are often wider nylon because this is easier to grab when dogging/working routes and drag is less of an issue because most sports routes are straight lines.

In terms of strength the key strength is the gate open strength – don’t go for anything less than 8kN. Also ignore any carabiner with a large notch in the nose that can catch / hang up on wires or tapes. When loaded in this position most carabiners will break at 3-4kN and most falls will generate this amount of force.
Don’t bother with accessory biners for racking nut keys or chalk bags – get something useful that could get you out of trouble one day – put the nut key on a full strength, light wire gate carabiner and put your chalk bag on a length of 5/6mm cord that can double as a prusic loop.
Screwgates are relatively heavy - often at least as twice as much as a lightweight wire gate – so choose carefully. You will need a HMS/Oval for your belay device, a nice HMS (or two) with plenty of internal space to act as central connectors and some smaller, offset D screwgates to link critical pieces together.
It used to be suggested that you use doubled-up, back to back snap gates instead of screwgates because this is lighter, but that is no longer the case i.e. DMM Phantom SG at 41g.
Passive Protection - Wires and Nuts.
Nuts are your core protection so don’t skimp – go for a versatile rack of nuts that offer you the maximum amount of placement options. The best mainstream nuts are:
- DMM Wallnuts
- (Anodised) Wild Country Rocks (not the Classic Rocks)
- Metolius Superlight Curve Nuts
- DMM/HB Alloy Offsets
These all have complex shapes that allow a multitude of placements – not only do these allow main axis and sideways placements, but they fit flares better, cam into marginal placements and keyhole into pockets.
Basic square shapes such as used on the Zero G, Black Diamond, Camp and Kong nuts are just not as good. Always also check the weight of the nuts you are looking at because there can be a significant difference between solid wires and those that have cut away sections i.e. WC Anodised Rocks v WC Classic Rocks. Also check that the larger sizes can be placed overhead easily i.e. the wire is stiff enough to support the weight of the head.
Mix brands and hence shapes – so if you have a core set of Wallnuts then next time choose Rocks or Curve nuts – this gives you different shapes and hence more options.
I t is easy these days to grab a cam and plug it in, but wires tend to be more reliable than cams because once placed there is less risk of them walking or rotating out of position. Thus wires are great for main runners and belays plus competency in placing nuts allows you to save your cams for higher up the route - a critical skill on very long pitches.
Alongside the mainstream wires there are also micro wires and large nuts.
t is easy these days to grab a cam and plug it in, but wires tend to be more reliable than cams because once placed there is less risk of them walking or rotating out of position. Thus wires are great for main runners and belays plus competency in placing nuts allows you to save your cams for higher up the route - a critical skill on very long pitches.
Alongside the mainstream wires there are also micro wires and large nuts.
Large nuts usually have a hexcentric shape and are best slung on dyneema. The better models - WC Rockcentrics and DMM Torque – have complex offset shapes that allow them to cam into a crack and offer the climber large protection at a fraction of the weight and cost of cams. In many situations these units can even be stronger and more dependable than cams.
It is commonplace to dismiss ‘hexes’ as being just for beginners, but knowing how to place the hexes well is a really useful skill that allows you to maximise your options and perhaps save your cams for when you really need them.
Don’t go for hexes on wire they are far less versatile.
Micro wires come in many different forms and, once again, variety is the key. You won’t really need these when starting out, but any extreme leader worth the name has a decent selection of micro nuts. RP’s and DMM IMPs are the best mainstream micro wires.
Camming Devices – Active Protection
Cams have changed climbing and the routes that can be climbed because in certain placements nothing else will fit – however they are expensive and heavy – so choose your first cams carefully. The usefulness of cams also depends a lot on the type of route and rock being climbed; parallel Grit cracks and Gogarth flares can often only be protected by cams, but mountain routes are often better protected by carrying more wires and dumping some cams.
The key sizes when forming a rack are 20-30mm, 30-45mm, 45-70mm – this equates to a Wild Country/DMM 1.0, 2.0 and 3.0 or BD Camalots 0.5, 1 and 2.
Once you have these cams you can fill in the half sizes WC/DMM 1.5 and 2.5.
The choice then is to go smaller or larger and that will largely depend on where and what you climb. However, don’t be afraid to mix brands.
If you go larger then the BD 3 is a good choice, if smaller then go for a specific micro cam – until recently I would have recommended CCH Aliens, but ongoing QA problems at CCH and the introduction of the great Metolius Mastercams means that the Mastercams are the new class leader. These micro cams are more flexible and work well in shallow cracks/pockets.
Slings
Climbers have generally migrated to dyneema slings for personal use and the best lengths are 60cm (4ft) and 120cm (8ft). A 240cm (16ft) sling can be useful for constructing belays.
Really skinny (8-10mm) 60cm dyneema slings can also be used as extendable quickdraws.
Keep each different length of sling a different colour to make it easier to identify them and most of all get a good system that avoids tangles.
Belay Device and Belay Carabiner
Your belay device should be safe to use with the ropes/rope diameters that you use – that is it should feed rope easily and yet be able to catch a fall easily and safely.
The belay device should be matched up with a suitable locking carabiner – belay carabiners are most commonly HMS shaped, but the new DMM Ultra O SG also makes an awesome belay carabiner that just does not cross load.
As always it's worth getting the most out of your belay device, meaning it should either be as light as possible i.e. the DMM Bugette (26g) or are as functional as possible i.e. the Petzl Reverso 3 (81g) which although more than three times the weight of the Bugette, allows the belayer far more options and can also be used for ascending the rope.
Nut Key
One per team – put it on a proper carabiner and a piece of cord.
Attaching the nut key directly to the harness with its integral wire gate or a single carabiner is a good way of embedding it in your thigh.
Prussic Loops
Although on many one-pitch climbs prusics aren't needed, it's worth just getting into the habit of always carrying them. Most climbers will carry two loops clipped to a karabiner at the rear of their harness - either two 1.3 – 1.5m lengths of 5mm cord, or one 1.5m and one 2.5m lengths.
5mm cord works well on most ropes, but some people prefer 6mm - again ensure that you know which knot to use and how many turns to apply to the ropes you are using.
